Crafty Moose gone wild!

Welcome to the Ticklish Moose blog!

Be sure to visit my webstore for some great freebies, as well as Ticklish Moose merchandise:


http://www.ticklishmoose.com/

Creative License

Creative Commons License
All Shown On This Blog by Ticklish Moose is licensed under a Creative Commons Attribution-NonCommercial-ShareAlike 3.0 Unported License.
Permissions beyond the scope of this license may be available at http://www.ticklishmoose.com.

Search This Blog

Saturday, May 19, 2012

Free Ephemera Friday- Saturday Edition

This week I was supposed to be resting my leg because of the nerve problem, until I can get into a specialist to get some 'nerve mapping' done.  It's hard for me to do anything for too long....sitting, walking, standing, reading....you name it.  So trying to sit still for too long...Ugh!  Too hard!  I decided to try to use some of the time creatively and work with some photo editing software.  I plan to use some Bingo card images in an upcoming project, so I had a little fun and I am sharing it with you!


Download Bingo Card Collage Here 


Here is one idea to get you started


And one more freebie to share:


Paper Doll Download 

Have fun! 

Tuesday, May 15, 2012

That Old Thing?

My 3 favorite little words right after "just take it".  
Those words began my chair project


The finish was shot and the seat was just formed rubbery plastic, not even a real rush seat!  But I knew immediately what I needed to do.  I washed off the bird poop and the old dried bubble gum.  I gave it a light sanding to remove the loose debris.  I got out a jar of my Country Living Caromal Colours Paint in 'paprika' and got to work under the shade of my big oak tree.

If you have never used these awesome finish products you just have to give them a try!  They bond without stripping, have a great vintage feel and you can layer the products to create all different kind of looks.  I gave this chair one good coat of paint, and then sanded away some for a vintage, worn effect.


I added a fun quote by tracing it on the chair with carbon paper and then going over it with a permanent paint marker, then lightly sanding again.


Since it was going to be out in the sun and the rain I used an outdoor poly coat to seal the whole chair.  I had part of a roll of chicken wire out in the shed that I cut up and formed into my 'basket' to hold the dirt and flowers.  This was probably the most tedious part, but I totally love chicken wire, so for me it was worth every minute!   I bought 2 coco-fiber window box liners at Big Lots for $4 each to form my liner to fit the odd shape .  Perfect!  


Added a few plants and voila`


Now enjoying a new life on my front porch!
I am so excited to see how much better it will look as the summer goes on and the plants mature  :D

The old shall be new
On this you can depend


Friday, May 11, 2012

Trellis Something Good

I don't want you to think a week has passed that a project has not been started or completed at our home.  In fact I was just thinking the other day that more days than not you will probably find a nail gun instead of dinner on the dining room table.  We had some exceptional weather this past week, and we took full advantage of every single day of it!  It won't be long before it will be too hot for me to be outside after about 10 AM.

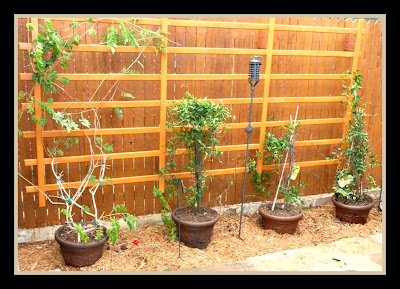
I'm sure if you have a garden, or even a patio you have priced a trellis.  They come all shapes and sizes, and of course price ranges.  We have a large shallow garden area on the lower patio/fire pit portion of our back patio that had bushes at one time, but we found it hard to keep them from encroaching on the patio itself.  We decided to tear out the bushes and add vines- primarily evergreen varieties that would keep the leaf debris cleanup to a minimum.  And let me add that the space gets the full Texas sun all afternoon.  I honestly get fed up with publications that show amazing gardens grown places like Washington state!  It takes True Grit to garden here as well as a modicum of masochism! 

Our trellis needed to be over 10 feet long and 5 feet high!  We are so fortunate to have been able to recycle cedar scraps from a work project!  I still plan to add some vertical strings to help coax the vines to fill in.  My son cut out, sanded and assembled it since my husband still does not have use of his arm.  I think it turned out great!

 
 I also took advantage of the shade from our large oak tree in the back yard to work on and paint an old chair.  I should have the project fully completed for the next post! (pending no continued rain-out)

Here is a peek:


A pic of my kitty enjoying the catnip I planted for her


And to keep with our wood/fence/outdoor theme today here is a great free background for your personal use


And to all the Moms out there- Happy Mother's Day!

Tuesday, May 1, 2012

Just a Quickie Re-do

Just when I think I can stay focused a project drags me into it's lair.  I'm not sure where I first saw this brainiac idea for a portable, folding, pretty-much-perfect-height ironing board upcycle but I thought I would do a quick share.  

What is great about this ironing board is you can add some quick table-top area close to where you are working!

First you need an old but sturdy folding TV table.  I have a few around- at the last neighborhood garage sale I picked up a set of 4 for $2.  I had this in mind, but will also more than likely also top one with a flannel-backed vinyl tablecloth for small messy projects.


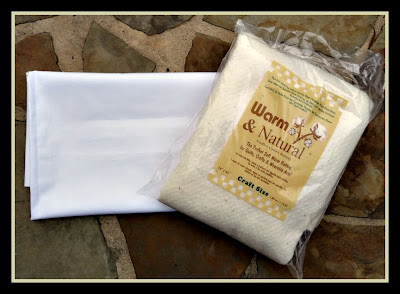
Next you will need some padding.  You can buy the fancy ironing board cover fabric if you wish, but it is a little pricey and not necessary.  I had some scraps of polyester batting left from an old upholstery project, some smooth white cotton sheeting and I purchased a small/craft size piece of Warm & Natural batting for about $2.50. 

 
 Of course you can use whatever fabric you wish- if you want to co-ordinate with your sewing room etc.  Just be sure that it is not heavily textured because that would transfer to whatever you iron on top of it.

You will also need a few basic tools:
staple gun and 1/2" staples
hammer (for staples that don't lie flat)
pliers (to pull out staples that mis-fire)
scissors to cut fabric
iron to smooth fabric
 optional- drill w/ 1/2" Forstner bit
 
 
 I drilled 4 holes in the tray top to help dissipate the steam, but this is not necessary.  I just like using my drill  :D

 Clean off the tray top and iron your batting and fabrics flat.  I tacked down the poly batting first to help prevent slipping, and then flipped the tray upside down on my layer of Warm & Natural topped with my sheeting.

Now just staple down your layers to the backside like you do for any upholstery project, anchoring each side with a staple before smoothing and finishing each side, then corners.


 Just be sure you staple close enough to the outer edge as to not impede the action of the folding legs.  Trim off the excess fabric and batting.


That's It!!

You now have an easy to store, inexpensive, portable ironing board


Happy Crafting!!

All My Best

Telling People What I Think For 40+ Years!!

Blog Advertising - Advertise on blogs with SponsoredReviews.com