


I haven't asked you to make me young again. All I want is to go on getting older.
- Konrad AdenauerThat quote sums up a lot of my feelings on the process of repurposing and upcycling items and clothing. I do not like the "throw away society" that we have become. I guess some of that comes from my age- after all, "back in MY day" when your TV broke you could take the back off, remove the tubes, go down to the corner grocery to test and replace the faulty parts. I love taking things that still have some life in them, and bringing them into this decade.
I have become obsessed with vintage images and image transfer. And I especially love bringing those long-forgotten images forward and creating something natty contemporary.
Here is the latest and greatest "after"

But ya gotta get there, right? So- let's do this thing!!
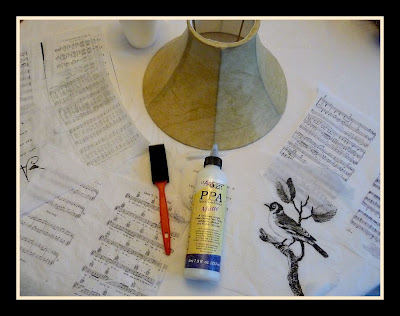
Start with one sad old lamp

My lamp is small with a vinyl-covered shade. This process would work for most any flat surfaced (non-pleated) shade. I simply downloaded this image from Graphics Fairy

Karen has 1000's of free images to use- and I go to her site often :)
I also used this image (quote) I found on the internet to build on, so to speak:

I also went online and found sheet music for 'bird themed' songs.....you know, like Rockin' Robin, Black Bird, Mockingbird, etc. Since my lampshade is just 7" high, I used Publisher to combine/print 2 images per 8 1/2" x 11" sheet of paper. I wanted the light to shine through the images, so I printed them onto tissue paper.
Here is where the word *tutorial* pays off for you- because I get to spare you a bunch of frustration and cursing sobbing.
- get some 1/2" wide 2-sided tape (you may use this already for scrapbooking)
- use plain cardstock paper, not textured (8 1/2 x 11)
- use cheap old tissue paper- not the kind with a *nice* glossy side
- if possible, print your images with a laser printer or use a copy machine. The toner-based inks do not run when you get them wet with decoupage medium.
DO NOT BELIEVE the other blogs that tell you that you can somehow stick the tissue paper with spray adhesive to the cardstock and run it through and come up with something usable in the end. THEY LIE!!!!!
Use this simple, Ticklish Moose Tutorial Tip, which makes it so simple you will laugh out loud....ready?? Bwaa-haaa-haaa!!
Tutorial Tip:
Simply adjust the size of your image so you have a decent 3/4" to 1" of margin space outside of the actual image you want to use. Stick the 1/2" wide piece of 2-sided tape across the leading edge (end that feeds into the printer) of the cardstock. You can use 2 smaller pieces on the other end just to keep the tissue paper nicely in place as it feeds through the printer. You can smooth out (or lightly crumple up) the tissue over top of the taped cardstock. Flip it over and trim off any excess tissue paper. Put the tissue paper covered cardstock into your printer so you print on the tissue paper side. Print your image and voila`...... you did it!! Carefully tear off your printed page.
Gather up your printed pages, a foam brush and whatever decoupage medium you prefer. I used PPA for this application.
I sprayed an acrylic topcoat over it just to make it easier to dust.
You could totally stop here if you want, but being a self-proclaimed Bling-a-holic.......


And a couple of Prima fabric flowers

Here it is in the daytime

and lit up at night

Have a fun week!!
Use this simple, Ticklish Moose Tutorial Tip, which makes it so simple you will laugh out loud....ready?? Bwaa-haaa-haaa!!
Tutorial Tip:
Simply adjust the size of your image so you have a decent 3/4" to 1" of margin space outside of the actual image you want to use. Stick the 1/2" wide piece of 2-sided tape across the leading edge (end that feeds into the printer) of the cardstock. You can use 2 smaller pieces on the other end just to keep the tissue paper nicely in place as it feeds through the printer. You can smooth out (or lightly crumple up) the tissue over top of the taped cardstock. Flip it over and trim off any excess tissue paper. Put the tissue paper covered cardstock into your printer so you print on the tissue paper side. Print your image and voila`...... you did it!! Carefully tear off your printed page.
Repeat as many times with the cardstock as you need images.
I used 6-7 printed sheets for my small shade (I had a few scraps leftover) Gather up your printed pages, a foam brush and whatever decoupage medium you prefer. I used PPA for this application.

Tear your images into pieces that suit the size of the shade. I tore the first few pieces to about the size of 1/4 sheet of paper. Then filled in later with some smaller pieces. Just crumple, decoupage and layer to suit your taste. Let it dry and trim off any straggly ends hanging off the edge of the shade.
I sprayed an acrylic topcoat over it just to make it easier to dust.
You could totally stop here if you want, but being a self-proclaimed Bling-a-holic.......

I added eyelash trim with my trusty glue gun!

And a couple of Prima fabric flowers


and lit up at night


Hi! Following you from the Blog Hop til You Drop Blog Hop!:0) Hope you visit me and return the follow!:0)
ReplyDeleteSo glad you stopped by. This truly looks like something from Anthropologie. I have a couple of boas I am waiting to use for the perfect lamp. Seeing yours, makes me hope that project comes sooner than later.
ReplyDeleteI appreciate you linking to "Meet Me On Monday"
Take care,
Lisa
You made this light shine!
ReplyDeletexo Cathy
Thank you so much for your nice compliments! :D
ReplyDeleteGreat tutorial, WONDERFUL shade!!!
ReplyDeleteKeep smiling and creating
Hi! Following you from the Blog Hop til You Drop Blog Hop!
ReplyDeleteHope that you will stop and visit me too :-)
DebsHere
http://debshere.blogspot.com/